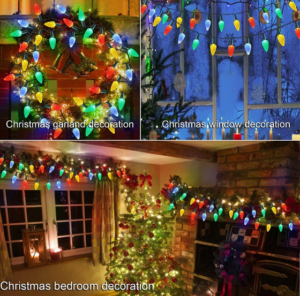
C9 Christmas lights can be a fun and festive way to decorate your home or yard for the holiday season. If you want to install C9 Christmas lights in your home, there are a few steps that you should follow to ensure that the installation is successful and safe.
Choose the Right Type of Lights
The first step in installing C9 Christmas lights is to choose the right type of lights. C9 lights come in two different types: incandescent and LED. Incandescent C9 lights are the traditional type of Christmas lights that have been around for decades. They can be more expensive than LED lights, but they offer a more traditional look and feel. LED lights, on the other hand, are more energy-efficient and cost-effective, but they tend to be brighter than incandescent lights.
Determine the Layout
Once you’ve chosen the type of lights you want to use, it’s time to determine the layout of your lights. Start by measuring the area you want to cover. Then, decide where you want to run the lights, as well as where you want to have them end. Keep in mind that you can change the layout later if you need to, so don’t worry too much about getting it perfect the first time.
Measure and Mark
Once you have a plan in mind, it’s time to measure and mark where you’re going to attach the lights. Use a tape measure to measure the distance between each light and make sure the distances are even. Mark the spots you’ll be attaching the lights with a pencil or marker.
Purchase the C9 Christmas Lights
Purchase enough strands of C9 Christmas lights to cover the length of the area you measured. . Make sure to choose lights that are designed for outdoor use, as they will be more durable and weather-resistant. You can find C9 Christmas lights at most hardware or home goods stores, or you can order them online. Make sure that you get enough lights to cover the area you want to decorate.
Test the Lights
Before you start the installation process, it is important to test the lights to make sure that they are working properly. Plug in each strand of lights and check to see if all the bulbs are working. If you find any defective bulbs, replace them before proceeding.
Attach the Lights to Clips or Hooks
Attach the lights to clips or hooks. Use plastic clips to attach the C9 Christmas lights to the roof, gutters, or other surfaces. Make sure the clips are secure and evenly spaced. You can find these at most hardware stores. Attach the clips or hooks to the eaves or gutters of your home, or to any other surfaces you want to decorate. Then, clip the lights onto the hooks or clips.
Secure the Lights
Once the lights are in place, it is important to secure them so that they don’t fall down or become damaged. Use zip ties or electrical tape to secure the lights to the clips or hooks.
Connect the lights
Once you have installed all the lights, connect them to an outdoor-rated extension cord. Then, plug the extension cord into an electrical outlet.
Enjoy your lights
Turn on your C9 Christmas lights and enjoy the festive ambiance they provide!
Installing C9 Christmas lights is a fun and easy project that can really light up the holidays. By following these steps, you’ll be sure to have a festive and beautiful holiday display. So get out your supplies and get ready to light up the holidays!