Crafting the perfect pie crust can be a daunting task for both beginners and experienced bakers. The classic approach often requires carefully cutting cold butter into flour by hand, which can be time-consuming and occasionally frustrating. However, using a food processor pie crust recipe simplifies this process and saves valuable time, allowing you to achieve a flaky and delicious crust with much less effort. Enter the food processor: a kitchen tool that simplifies this process and has the potential to make your pie crust-making journey not just easier, but also enjoyable. This guide will delve into everything you need to know about making a food processor pie crust, including tips, techniques, variations, and troubleshooting advice.
Understanding the Basics
What is a Pie Crust?
A pie crust is essentially a pastry dough that forms the base of many beloved desserts, from sweet fruit pies to savory quiches. The crust can have various textures, ranging from flaky to tender, and it generally consists of four primary ingredients: flour, fat (usually butter, shortening, or lard), water, and salt.
Types of Pie Crusts
- Flaky Crust: This type of crust is characterized by its light, flaky texture, which is achieved by keeping the fat in larger pieces.
- Mealy Crust: This crust has a more crumbly texture, ideal for custards and fruit fillings as it holds up well under moisture.
- Sweet and Savory Variations: Different crusts can also be adapted for sweet or savory applications through adjustments in sugar and fat types.
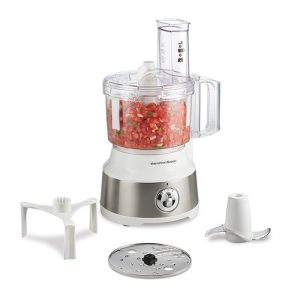
Why Use a Food Processor?
Using a food processor can streamline the process of making a pie crust. Here are some key benefits:
- Speed: A food processor quickly incorporates the fat into the flour, reducing the overall time needed to prepare the dough.
- Consistent Texture: The machine can achieve a more uniform texture, resulting in even distribution of fat.
- Less Mess: The process is contained within the food processor, minimizing the cleanup.
Ingredients You’ll Need
Basic Ingredients
- All-Purpose Flour: The foundation of your crust. A high-quality flour ensures structural integrity.
- Fat: Butter is the most commonly preferred fat for its flavor and flakiness, but you can also use shortening, lard, or a combination.
- Salt: Enhances flavor. Use kosher or sea salt for the best results.
- Cold Water: This is added to bring the dough together and should be as cold as possible.
Optional Ingredients
- Sugar: Small amounts can be added to sweet pies, enhancing flavor without overwhelming the crust.
- Vinegar or Lemon Juice: Adding an acid can help to tenderize the dough and improve flakiness.
- Eggs: Some recipes call for eggs to enrich the dough, giving it added flavor and color.
Step-by-Step Instructions for Making Pie Crust in a Food Processor
Step 1: Prepare Your Ingredients
Before starting, measure out your ingredients. Typically, you’ll need about:
- 2 ½ cups all-purpose flour
- 1 cup unsalted cold butter (cut into small cubes)
- 1 tablespoon sugar (optional, for sweet pies)
- 1 teaspoon salt
- 6-8 tablespoons cold water
Step 2: Combine Dry Ingredients
In the bowl of your food processor, add the measured flour, salt, and sugar (if using). Pulse the mixture a couple of times to evenly distribute the dry ingredients.
Step 3: Incorporate the Fat
Add the cold butter cubes to the flour mixture. Pulse the processor about 15 to 20 times, or until the mixture resembles coarse sand with pea-sized pieces of butter throughout. Avoid over-processing; you want visible pieces of fat for flaky pastry.
Step 4: Add Cold Water
With the processor running on low speed, begin adding cold water one tablespoon at a time. Continue to add water until the dough begins to clump together and form a ball. You may not need to use all of the water, so proceed cautiously.
Step 5: Form the Dough
Once the dough starts to come together, turn off the food processor. Lightly pinch the dough to see if it holds together. If it crumbles, add a bit more water.
Turn the dough out onto a clean surface. Divide it into two equal parts (for a top and bottom crust), flatten each into a disc, wrap them in plastic wrap, and refrigerate for at least 1 hour.
Step 6: Roll Out the Dough
After chilling, remove the dough from the fridge. Let it sit at room temperature for about 10 minutes—this will make it easier to roll out. On a floured surface, roll it out to your desired thickness, typically around 1/8 inch. Aim for a circle that is about 2 inches larger than your pie pan.
Step 7: Transfer the Dough
Carefully lift the rolled dough into the pie pan, gently pressing it into the corners. Trim any excess dough, leaving about an inch overhang. Fold the edges under and crimp them for a decorative touch.
Step 8: Pre-Bake
For certain pies, you may want to pre-bake your crust. To do this, preheat your oven to 375°F (190°C). Place a piece of parchment paper over the crust and fill it with pie weights or dried beans. Bake for 15 minutes, remove the weights and parchment, and bake for an additional 5-10 minutes until lightly golden.
Tips and Tricks for Perfect Pie Crust
Keeping Ingredients Cold
Maintaining the temperature of your ingredients is crucial. Cold fat and water lead to a flakier crust, as warmer fat tends to blend into the flour too thoroughly.
Don’t Overwork the Dough
While the food processor is efficient, be mindful not to overprocess or over-handle the dough. Overworking it can develop gluten, resulting in a tough crust.
Experiment with Blind Baking
Blind baking involves baking the crust before adding any fillings. This technique is particularly useful for pies with high-moisture fillings, like custards or fruit pies.
Use Quality Ingredients
The better the ingredients, the better your crust will be. Select the best butter, flour, and salt you can find.
Experiment with Flavors
Feel free to experiment by adding spices, herbs, or even citrus zest into the flour to give your crust a unique twist that complements your filling.
Common Problems and Solutions
Tough Crust
Problem: If your crust turns out tough, you may have overworked it or used warm ingredients.
Solution: Always keep ingredients cold and handle the dough as little as possible.
Crust Shrinking
Problem: A shrinking crust can occur when the dough is not adequately chilled before baking.
Solution: Ensure you let the dough rest in the refrigerator for at least an hour and avoid stretching it when placing it in the pie pan.
Uneven Cooking
Problem: An unevenly cooked crust could be due to uneven rolling or an uncalibrated oven.
Solution: Make sure your dough is rolled evenly, and consider using an oven thermometer to check for any inconsistencies in temperature.
Soggy Bottom
Problem: A soggy crust can occur with juicy fillings.
Solution: A layer of flour or ground nuts can be added to the bottom of the crust before adding the filling to absorb excess moisture.
 Creative Variations
Graham Cracker Crust
Use crushed graham crackers instead of flour for a quick and tasty alternative. Combine the crackers with melted butter and sugar, then press into the pan.
Nut Crust
For a gluten-free option, blend nuts (like almond or pecan) into a crumb and combine with butter and sugar for a rich flavor profile.
Herb-Infused Crust
Add finely minced herbs such as thyme or rosemary into the dough for a savory pie crust that pairs well with vegetable or quiche fillings.
Conclusion: food processor pie crust recipe
Using a food processor pie crust recipe can truly transform your pie-making journey. This method not only streamlines the process, making it faster and more efficient, but it also results in a consistently excellent crust. With the right ingredients and techniques, along with some helpful troubleshooting tips, you’re on the path to crafting delightful, flaky pie crusts that are sure to impress your family and friends.